Lavorando come ammaestratore di bit da qualche anno, la maggiore soddisfazione è nell’avere una rete che funziona bene e che garantisce le massime prestazioni che l’hardware consente. Inutile sperare di avere ciò che non si ha e mai si potrà realizzare, quindi accontentiamoci di quello che viene.
Nei giorni precedenti alcuni utenti della mia rete hanno fatto dei trasferimenti dati consistenti verso alcuni servizi di storage internazionale. Tanta tanta roba, trasferita in tanti giorni sfruttando la maggiore parte della banda disponibile.
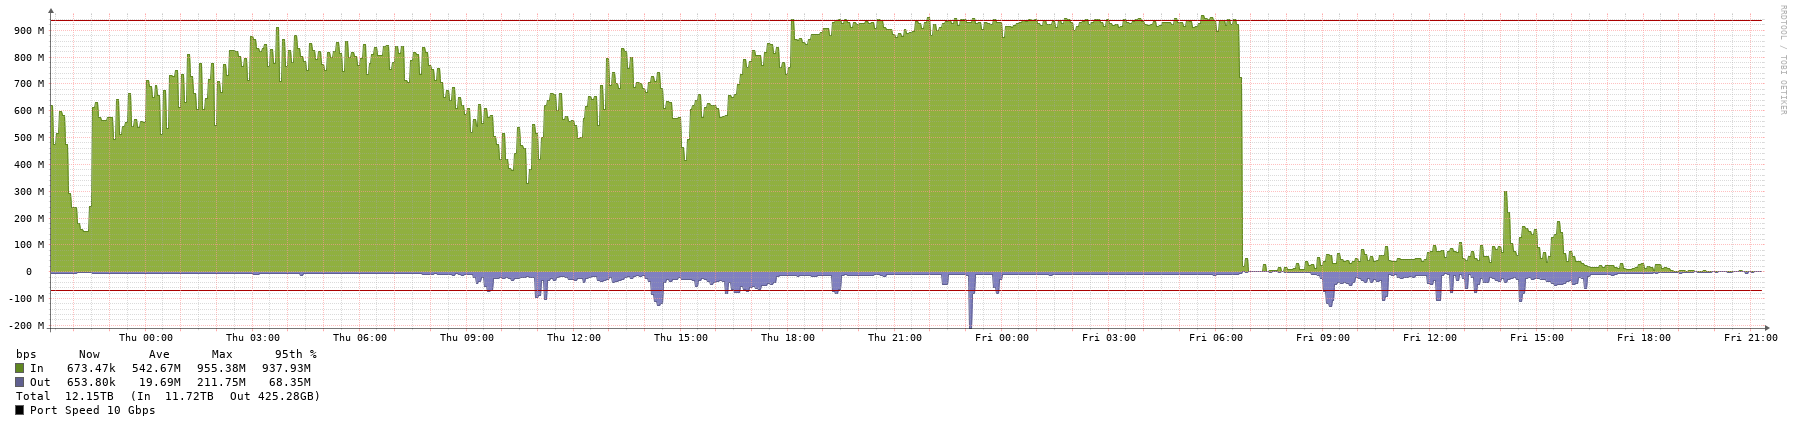
E’ stata una sorpresa anche per me, arrivare in ufficio e trovare sul NMS un bel muro di bit che testimoniavano il corretto funzionamento del sistema.
Net Load su una interfaccia ottica.Net Load su un apparatoTraffico sulla interfaccia di uscita dell’ente.
Considerando che i nodi sono connessi ad 1Gbps, arrivare ad una banda di 973Mbps è (almeno per me) tanta roba. Non è tutta farina del mio sacco, ci sono anche altri colleghi che lavorano con me per fare in modo che questo “miracolo” si compia. Quindi grazie anche a loro!
Situazione: ho una serie di router Mikrotik disseminati in giro, che cerco di tenere aggiornati in modo da evitare (noti) problemi di sicurezza.
La maggiore parte di questi router, deve garantirmi l’accesso da remoto usando OpenVPN, un sistema consolidato, ben funzionante e stabile. Da qualche tempo, il mio portatile benchè si connetta ai sistemi remoti, non “naviga” se ho impostato la VPN per fare passare tutti il traffico attraverso il tunnel cifrato.
Ieri, dopo avere faticato per fare funzionare wireguard sul sistema windows, mi sono incaponito. Devo capire dove sia il problema. Ho fatto diverse prove con wireshark, con il torch, con le configurazioni LOG del firewall… nulla. Mi sono messo a carcare su web ed ho trovato un post molto interessante: in soldoni, si dice che la VPN potrebbe non funzionare a causa di un bug firmware introdotto nelle release >7.9.2 Il bug, impedisce al SO, di creare una interfaccia dinamica alla quale associare l’ip della VPN lato “router”.
Ho deciso di dare una prova (ormai… ne ho fatte centinaia) facendo un downgrade della RB da 7.10.2 alla 7.9.2 e …. magia: tutto funziona nuovamente!
Anche questa volta, Mikrotik si è fatta odiare un po’ ma ho imparato che prima di perdere tempo, occorre cercare sui forum!!!
Domenica mattina, piove. Dalla sala da pranzo si leva, disperato, l’urlo dei familiari in preda al dolore: “non funziona internet”. Tralasciamo la semantica della frase. Attendo qualche minuto, sperando in un down temporaneo del gestore e poi decido di andare in soffitta a riavviare il router esterno, una operazione davvero semplice, basta scollegare il POE.
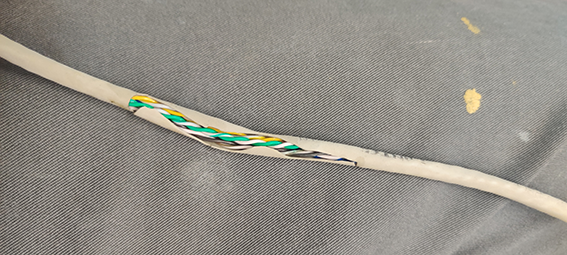
Una volta in soffitta noto con stupore che entra acqua dal lucernaio, pertanto sarà necessario intervenire appena il tetto sarà asciutto per rimettere il silicone. Mi avvicino al POE e noto, con disperazione, che esce acqua dal cavo di rete. Non mi era MAI capitato prima. L’allagamento del cavo ha messo in corto il POE che è (fortunatamente) andato in protezione.
Ok, e adesso? Piano A, aspettare lunedì e la fine del monsone per andare sul tetto e capire cosa cavolo sia successo. Piano B, andare subito sul tetto per sistemare l’accesso alla rete internet e ripristinare la pace famigliare. Vada per il piano B. In cantina trovo una matassa di cavo UTP cat 5e da esterno e vado sul tetto con la giacca cerata da montagna, sotto la pioggia. Cambio al volo il cavo, perdo almeno 30 minuti per farlo rientrare in casa dal foro sulla parete (non sono riuscito a fare uno sfila-infila). Riconnetto e tutto riparte.
Cosa è successo? Il cavo che ho installato 6 anni fa, era da interno e non protetto da guaina. La solita cosa “metto un cavo volante poi con calma faccio le cose per bene”. Ecco, ancora sto aspettando di farle “per bene”. Con il sole la guaina del cavo si è irrigidita e spaccata, facendo entrare copiosa acqua piovana. Questa seguendo il principio dei vasi comunicanti e grazie alla capillarità dei cavetti AWG24 è riuscita a trovare una facile strada per entrare in casa ed allagare il POE che è appeso ad una parete.
Ieri sera, dopo una lunga attesa, ho deciso di aggiornare il firmware della Mikrotik hAP Ac2 (RBD52G-5HacD2HnD-TC) alla versione 6.49. Ho fatto questa operazione un sacco di volte e non ho mai riscontrato problemi. Anche ieri sera, ho selezionato “Download and Install” ed ho atteso. Malgrado la lunga attesa, il sistema non è tornato disponibile. Ho provato a spegnere e riaccendere, a resettare… nulla. Ho pensato di avere bricckato la MKT, ma prima di buttarla nel cesto del “recupero componenti”, ho voluto fare una prova con “netinstall”.
Si tratta di un software che ha la funzione di bootp e consente di sfruttare il boot da rete per installare il sistema operativo su una Mikrotik, anche se winbox non la dovesse riconoscere. In pratica è la ultima spiaggia prima del ” recupero componenti”. Sapevo che questo programma fosse “ostico” da fare girare su windows ed in effetti così è stato. Malgrado i tentativi di: – disabilitare il firewall; – spegnere/disabilitare tutte le periferiche non 802.3; Non c’è stato verso di avviare il programma che risponde SEMPRE con un errore di bind(), ovvero con l’impossibilità di creare un socket. Amareggiato da questo comportamento ho fatto una prova con WINE in ambiente linux. Il programma viene eseguito ma, in questo caso, penso non gradisca la presenza di più indirizzi IP sullo stessa interfaccia BR0.
La soluzione del problema è arrivata tirando fuori, dallo scatolone dei ricordi, un vecchio adattatore USB – Ethernet della DLINK. Un oggettino del 2009 che ancora funziona. Linux lo ha riconosciuto subito, ho assegnato a questa interfaccia l’indirizzo IP 192.168.88.2 ed ho avviato la versione per linux di netinstall. Avendo preventivamente scaricato la immagine da mettere sulla Mikrotik, il processo di flash è statto “relativamente” veloce e non ha restituito alcun errore. Ho riavviato la MKT e tutto sembra funzionare correttamente.
Given the topology in my previous article, what if I want to use another controller flavour? Let’s say I want to test with RYU. Let’s recall the topology:
SDN testing topology
Let’s fire RYU and FlowManager up and open address http://192.168.122.100:8080/home/index.html with Firefox. Binding switches with the controller, will result in the topology populating. Please notice that RYU and FlowManager won’t add any default flow to switches, so you will be UNABLE to ping from iptermi-x to ipterm-y
RYU controller at work!
As you can see, all the matching traffic will be sent to the controller. No way to get it spread over the other ports.
Default RYU flows.
So long, and thanks for all the fishes! This post celebrates the end of a very hard work. It was really hard to configure virtual machines (first attemp) and GNS3 appliances (second attemp) to have two different controllers up and running. It required many hours, and a lot of heat from my laptop. I hope this will help someone to better understand SDN.
Well… this is a real milestone for me: having a complete SDN system in GNS3, which can be shown to students, without requiring an ethernet connection. A great effort for me and my laptop, which has been running out of memory for a couple of times. Let’s get into the topology and show some results.
Gns3 topology.
Yep, topology is huge but is very similar to the one used by David Bombal on his tutorial. Due to RAM constrains, I’m using two GNS3 simple switches instead of the CISCO virtual switch. On left side, two UBUNTU servers, the upper one is configured to execute OpenDaylight and Cisco OFM. It has a static IP address. The lower one, will run RYU controller and FlowManager. Only one controller is used at a time, so the other server can act as a simple web client On the right side, the switching farm, with eth0 serving as management interface and 3 ipterm devices, running as clients. All the switches are connected to a controller.
First tests were made using ODL and OFM. After the client have succefully pinged each other, the ODL controller show the complete topology made up of three switches and three hosts.
ODL topology after ping.
The topology can be explored with CISCO OFM as well:
Cisco OFM topology view.
Well…I think the most amazing view is the one showing topology on the left and flows on the right. In this way you can have a good understanding of what’s going on with the flows. Please notice that the flows are “pre-programmed”.
Topology and Flowtable.
Adding a flow requires to select a device and fill a form to select Table, FlowID and Priority. Options on the left side, will enable form fields on the left, allowing user to tailor the flow to his needs. In the example shown, traffic incoming on port 10, will be dropped. Please notice that this is NOT an access-list, it won’t change switch configuration. It’ll alter the way the data plane manages the packet flow!
Adding a flow
Sending the flow to the switch, will stop the packet flow, hence ipterm-3 won’t ping anymore.
Showing the effect of a flow-commit.
Exploring switch flow table, will show the user-flow and will allow to remove it, restoring switch full functionality.
So far… so good! I’m approaching the end of the course. Still 22% to go but, it’s fine! The problem I’m facing now is getting Cisco OFM app running. My testbed is: – virtualbox VM running mininet, bridged to laptop’s ethernet adapter; – virtualbox VM running Ubuntu 20.04 with lots of ODL versions installed and bridged to laptop’s ethernet adapter.
David Bombal instructions and my revision: 1- install a fresh linux system and perform updates and upgrades; 2- install ODL prerequisites as described in my previous article; 2.1 – you should have ODL 0.8.4 up and running; 2.2 – you should be able to connect to ODL web interface http://<ip>:8181/index.html 2.3 check you have following features: odl-restconf-all odl-openflowplugin-all odl-l2switch-all odl-mdsal-all odl-yangtools-common 2.4 install odl-dlux-core and all odl-dluxapps 3 – get a coffee! 4 – git clone http://github.com/CiscoDevNet/OpenDaylight-OpenFlow-App.git 4.1 – sed -i ‘s/localhost/<ip_host>/g’ ./OpenDaylight-Openflow-App/ofm/src/common/config/env.module.js 4.2 apt install npm 4.3 npm install grunt@1.2.0 –save-dev 4.4 apt install node-grunt-cli 5 enter directory OpenDaylight-OpenFlow-App: cd OpenDaylight-OpenFlow-App grunt At this point: Running "connect:def" (connect) task Waiting forever... Started connect web server on http://localhost:9000
Now.. let’s create a topology on mininet: sudo mn –controller=remote,ip=192.168.188.223 –topo=linear,2
OpenDayLight is up and Running!OFM is up and running and connected to OpenDayLight controller.OFM flow management
Please notice that OFM plays the role of an APPLICATION, which connects to an ODL controller and manages the flows on the switches. If you have some time, you’ll be able to get have it working even on GNS3 “real” topology!
I need a way to show students (easily, not too much code) what an SDN and why is it so cool. So, while attending to David Bombal course, I’m trying to find a good teaching solution. In my previous posts, I described my efforts to installa ODLand HPE VAN SDN, but I stille missed an easy interface to interact with flows. The solution to this problem, came with RYU, and old (but, let my say… gold) SDN project written in python and from “Flowmanager” a ptyhon RYU app.
Installing RYU is quite easy, provided you follow the instruction given on its github repo. More information are available on this site. The only issue I found is with the “eventlet” python module, which was upgraded to correct a potential DOS problem. This has removed a wsgi.ALREADY_HANDLED function, and results in ryu-manager not running. The solution is to install the old version: pip install eventlet==0.30.0 Invoking ryu-manager with sudo ryu-manager --wsapi-port 8081 --verbose results in the program starting up and being ready to accept connections from the switches. Installing “FlowManager” is even easier, as you just have to clone a github repo. In order to bind FlowManager with RYU is sudo ryu-manager –observe-links ~/flowmanager/flowmanager.py Once the software starts, we can access the app via the browser, by pointing to http://<ip>:8080/home/index.html
Test topology on GNS3
To do some testing, I connected the well known GNS3 topology, and the result is amazing!
Basic RYU installation and OpenvSwitch integration
Please notice that running ryu-manager without any application, will result in the OpenvSwitch behave as a dumb piece o virtual metal: no frames will be forwarded, as no flows are entered in the switch flow table. Let me say that there is a HUGE difference between the HPE VAN SDN (which will flood the switch flows) and the RYU, which will remain “silent”. Invoking: sudo ryu-manager ryu.app.simple_switch_13 ~/flowmanager/flowmanager.py --observe-links will result in the ry-manager starting up and loading TWO apps: the simple switch (with OpenFlow 13 support) and the FlowManager. Once the switch connects to the controller, flows are sent to the table and routers are able to ping. Let’s check this.
Flows on the OpenvSwitch with the RYU simple_switch_13 app runningFlows as seen from the FlowManager web Interface.Topology showing all routers, after he switch has sensed all the nodes.
After some further efforts from my previous post, I finally manged to get some data from ODL controller. I feel little frustrated in having so many issues but I keep on trying!
Reference Topology as per GNS3 course exercise.
Using Yang-UI I managed to get some information from the OpenvSwitch in the topology. Please notice how many information is it possible to acquire and a small section dealing with “tables” and “flows”.
Querying the nodeFlow Information
Now, let’s go further! In the David Bombal videos, an HPE VNA SDN application is shown. By doing some Google search, it is still possibile to download the appliance for free testing. Please notice it’s a pretty old piece of software, so do expect some troubles in the way it works. Finding the product n HPE site can be boring, frustrating and time wasting, so please use this link!
Download site for HPE VAN SDN Controller.
The virtualbox appliance works like a charm. It will be ready to work in a few minutes, but you’ll have to use Firefox to access the 8443 port of the controller, due to Chrome security paranoid behaviour. After loggin in the controller, you’ll be able to register your devices on the controller and see the topology.
The OpenvSwitch in GNS3 – Data Path GNS3 OpenvSwitch port description.
Unfortunately there is no way to have a copy of “Northbound Networks” “Flow Maker Deluxe” app, which is extensively used by David Bombal in his videos. In a forum I found an interesting post, stating that the FlowManager App has similar functions when used on RYU environment. I’ll test it. My goal is still to have a controller+app working, to show students what the potential of SDN is.
During my effort to finish the lectures of the GNS3 academy, I came to a point in which a demonstration is given of an SDN network. The GNS3 topology is fair simple, as it involves only two routers, an OpenVSwitch and a cloud connection.
Basic Topology for SDN tests
Inspite of its simplicity, there are some issues with this exercise, nevertheless it was useful to try and test OpenDayLight installation. The lecture is based on a github repository: CiscoDevNet OpenDayLight-OpenFlow-App. In this repo, there are some instruction to setup a OpenDayLight (ODL) controller, which will be interfaced with Mininet and the Cisco APP. More info about the latter can be found here. The point is that the application is really old and no longer maintained as there is an update version called “Cisco Open SDN Controller“. Unfortunately, even this product is EOL, even if it is possibile to download the software, provided you have a “service contract” with Cisco. Files are called “osc-vbox-1-2-1.zip” and “osc-vmware-1-2-1.zip. The coolest point IMHO is this sentence: “There is no replacement available for the Cisco Open SDN Controller 1.x at this time.”
There is some “light” at the end of the tunnel, and the source is “SDN-Openflow-Controller-VMs”, a sourceforge project you can reach via this link. The issue with this work is the complete LACK of documentation. Username and password are not provided to login to the VM, so I had to perform a password recovery to change username to user and password to asdf. Up to now, this approach is completely unusefull.
Was it a total waste of time? No, I managed to install ODL on a Ubuntu VM (20.04 LTS) by using this cool tutorial.
Interfaccia ODL funzionante.
2021 05 12 Edit I do not resign very easy, when I have to face some issues. So I want the controller to have an interface! I tried these steps: – OpenDayLight 14.0 -> git clone of the dlux repo. Build the software ( freaky hard for me), and try to integrate with ODL. No success: I don’t know how to tell ODL a new feature is there. I sent an email to a contributor. OpenDayLight 0.8.4 -> downloaded ODL package from this site (the main site is not always clear). The dlux feature is still there, so just enable it and have fun. How to enable it: sudo -E karaf (wait) opendaylight-user@root>feature:install features-dlux features-deluxapps The issue I faced is about the port 6633 not being opened by the ODL controller, until opendaylight-user@root>feature:install odl-l2switch-all
After all the efforts, and having spent two days coding and eating my nails, I can proudly show some screenshots.
OpenVSwitch in GNS3 topo is able to ping the controller, running on VirtualBoxThe switch shows up in the ODL dlux interface.